COD Warzone Revive Animations Pack (Not Just "Poses" - Actually Animated)
 (2).jpg)


![[4K] MWII Jeans Soap Kit for MP Male](https://img.gta5-mods.com/q75-w500-h333-cfill/images/mwii-jeans-soap-kit-for-mp-male/644529-Cover.jpg "[4K] MWII Jeans Soap Kit for MP Male")


370
18
370
18
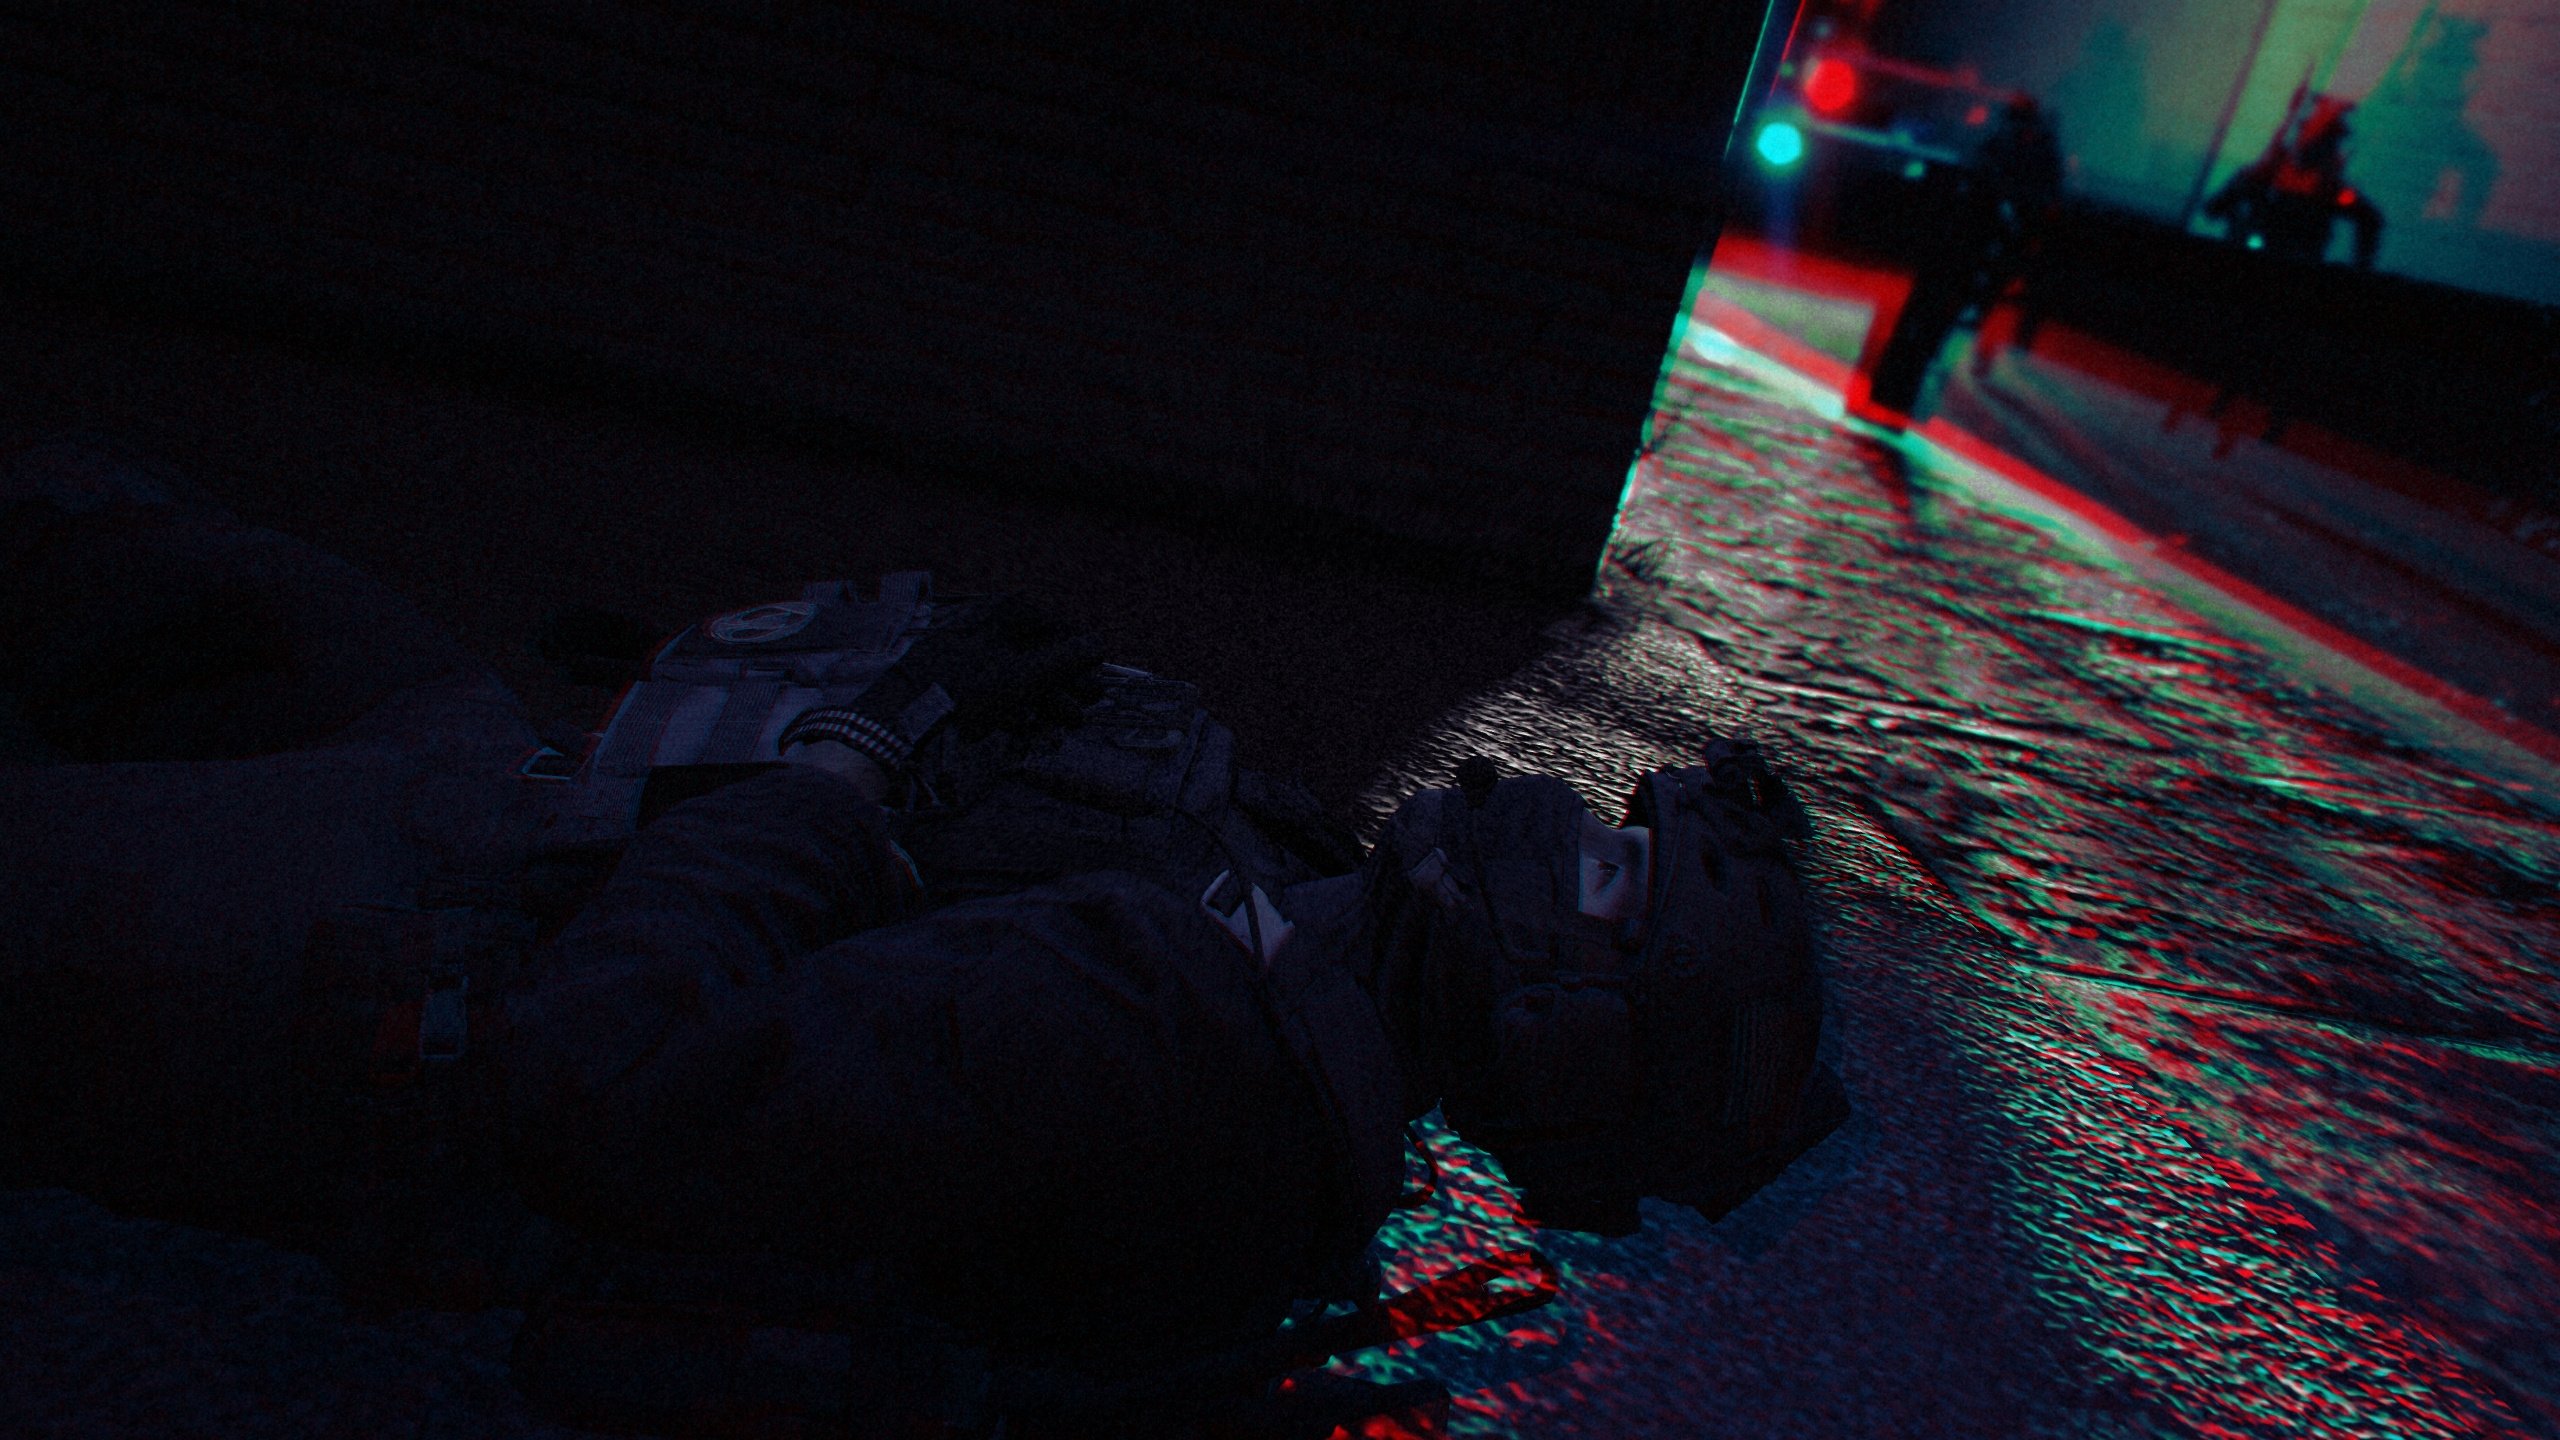
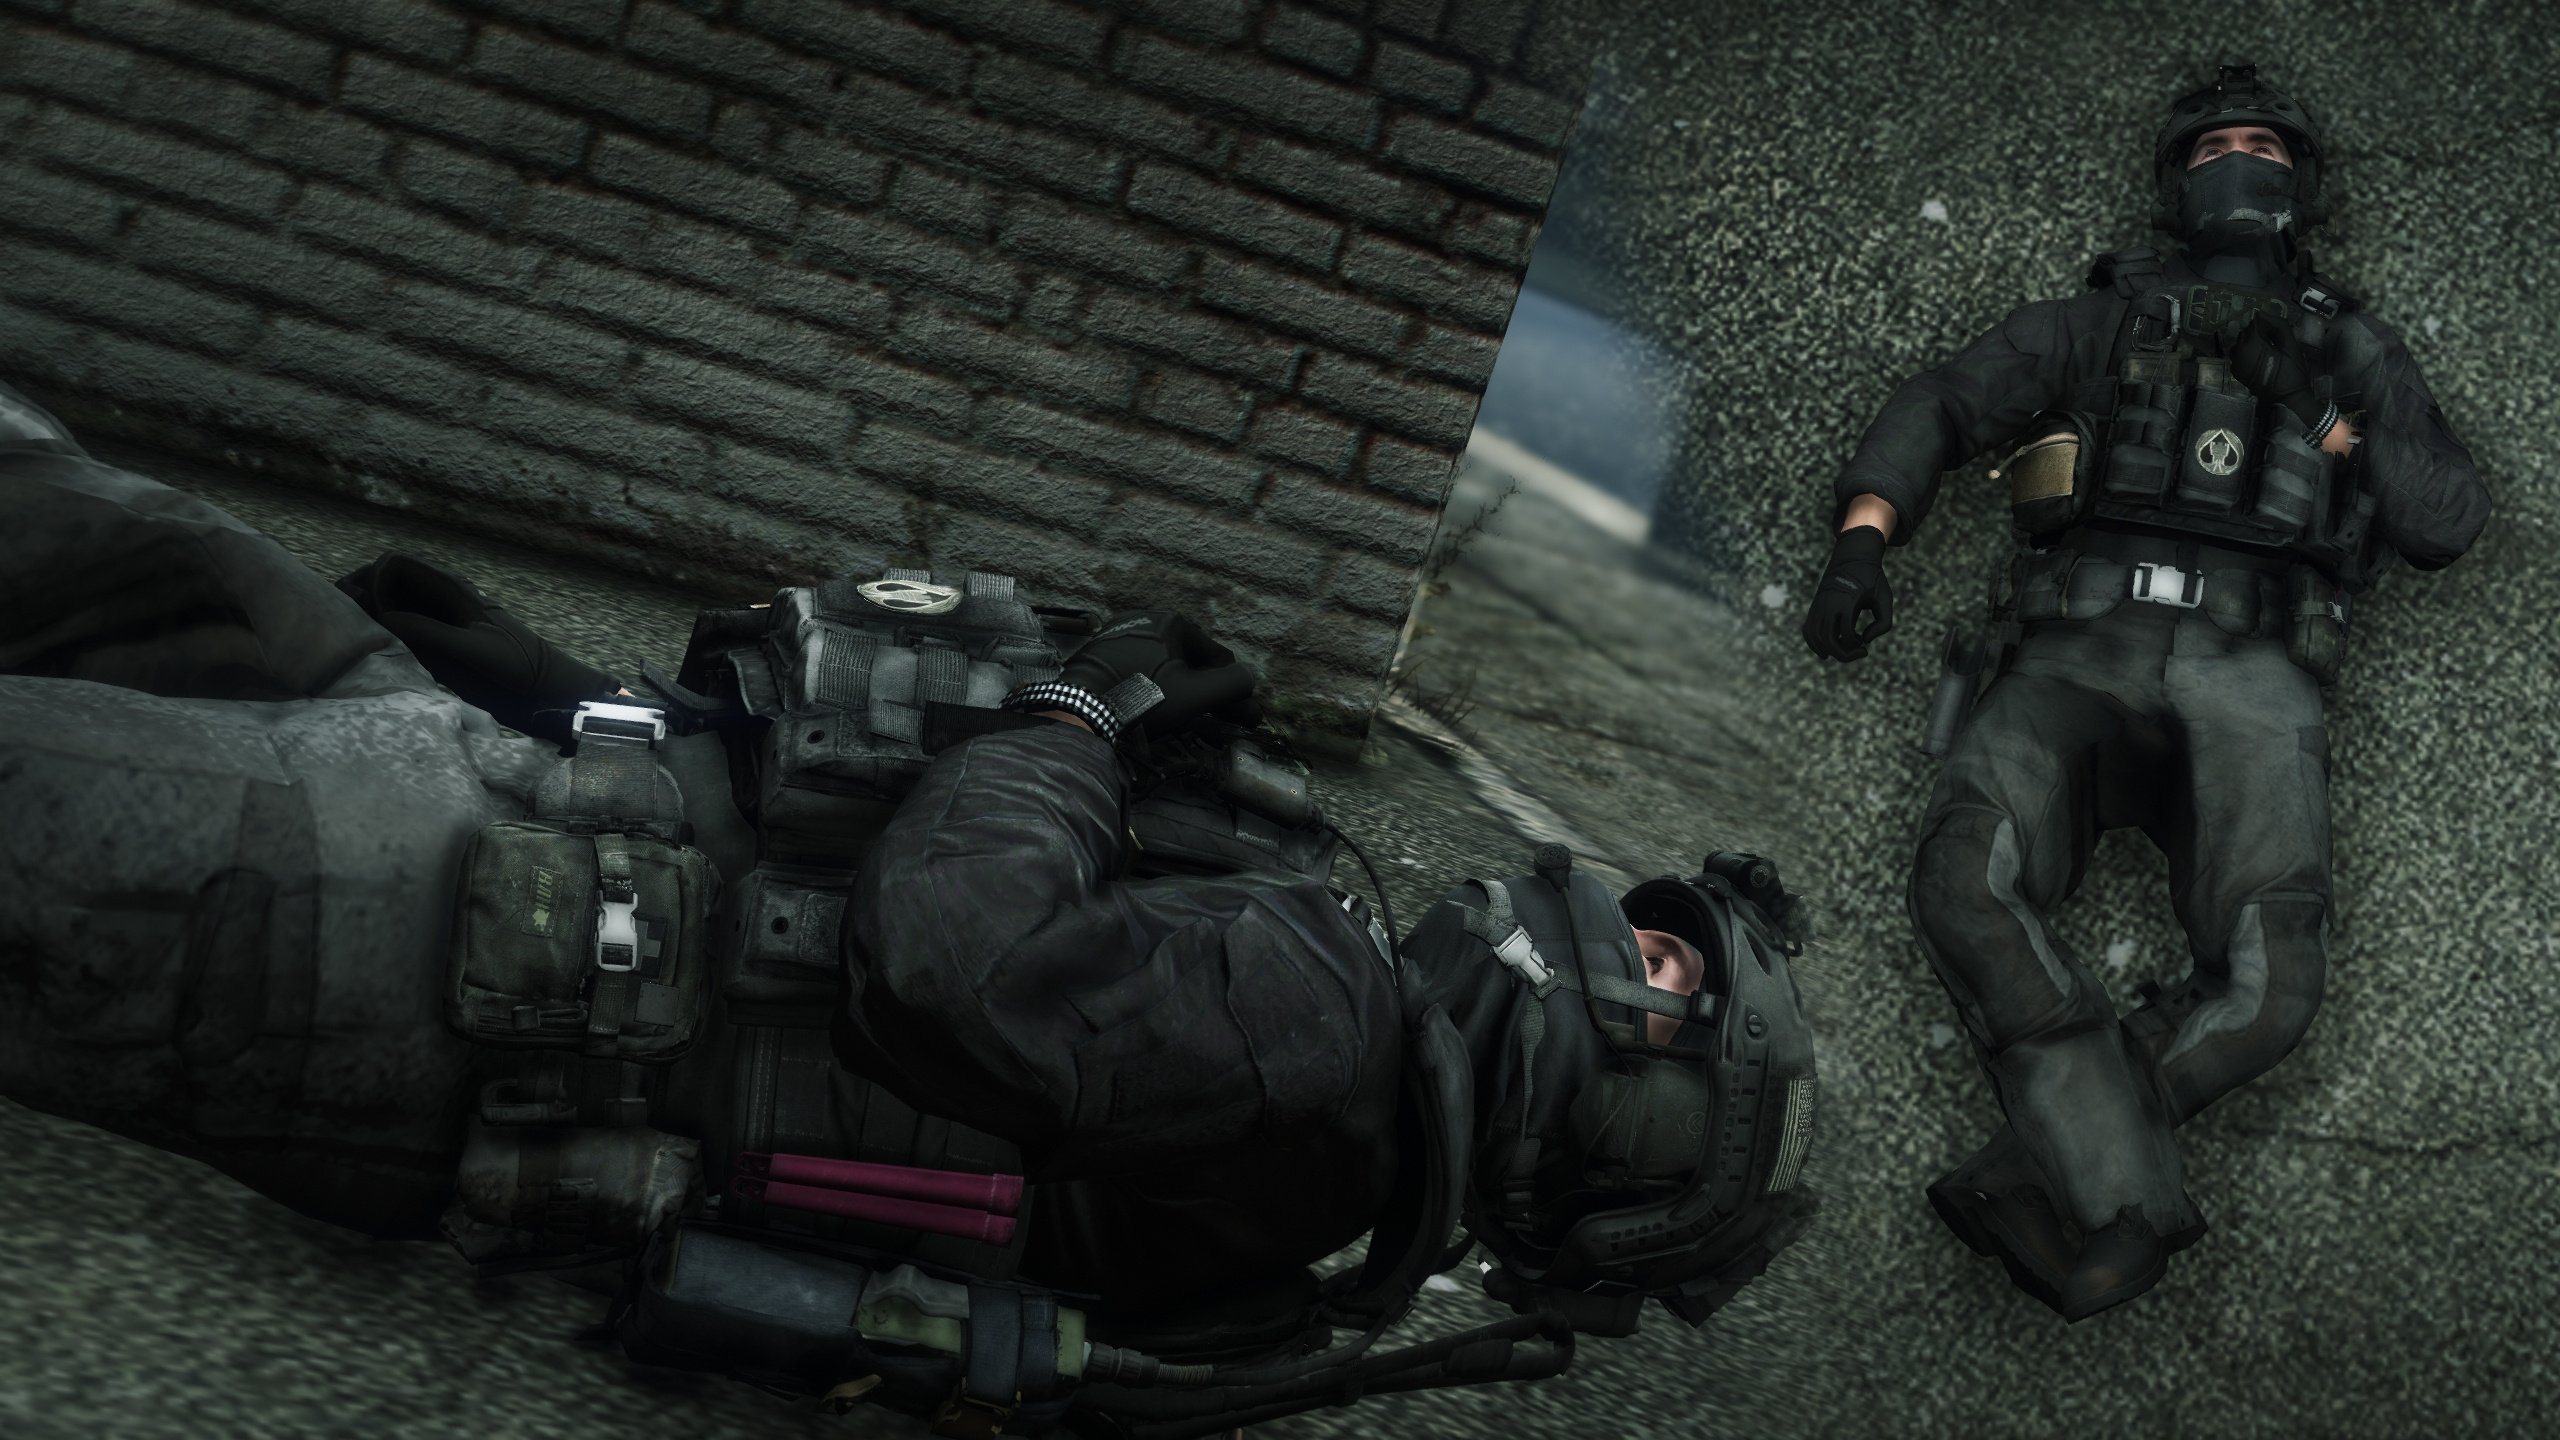
Just millimetres from a trip to the Gulag...
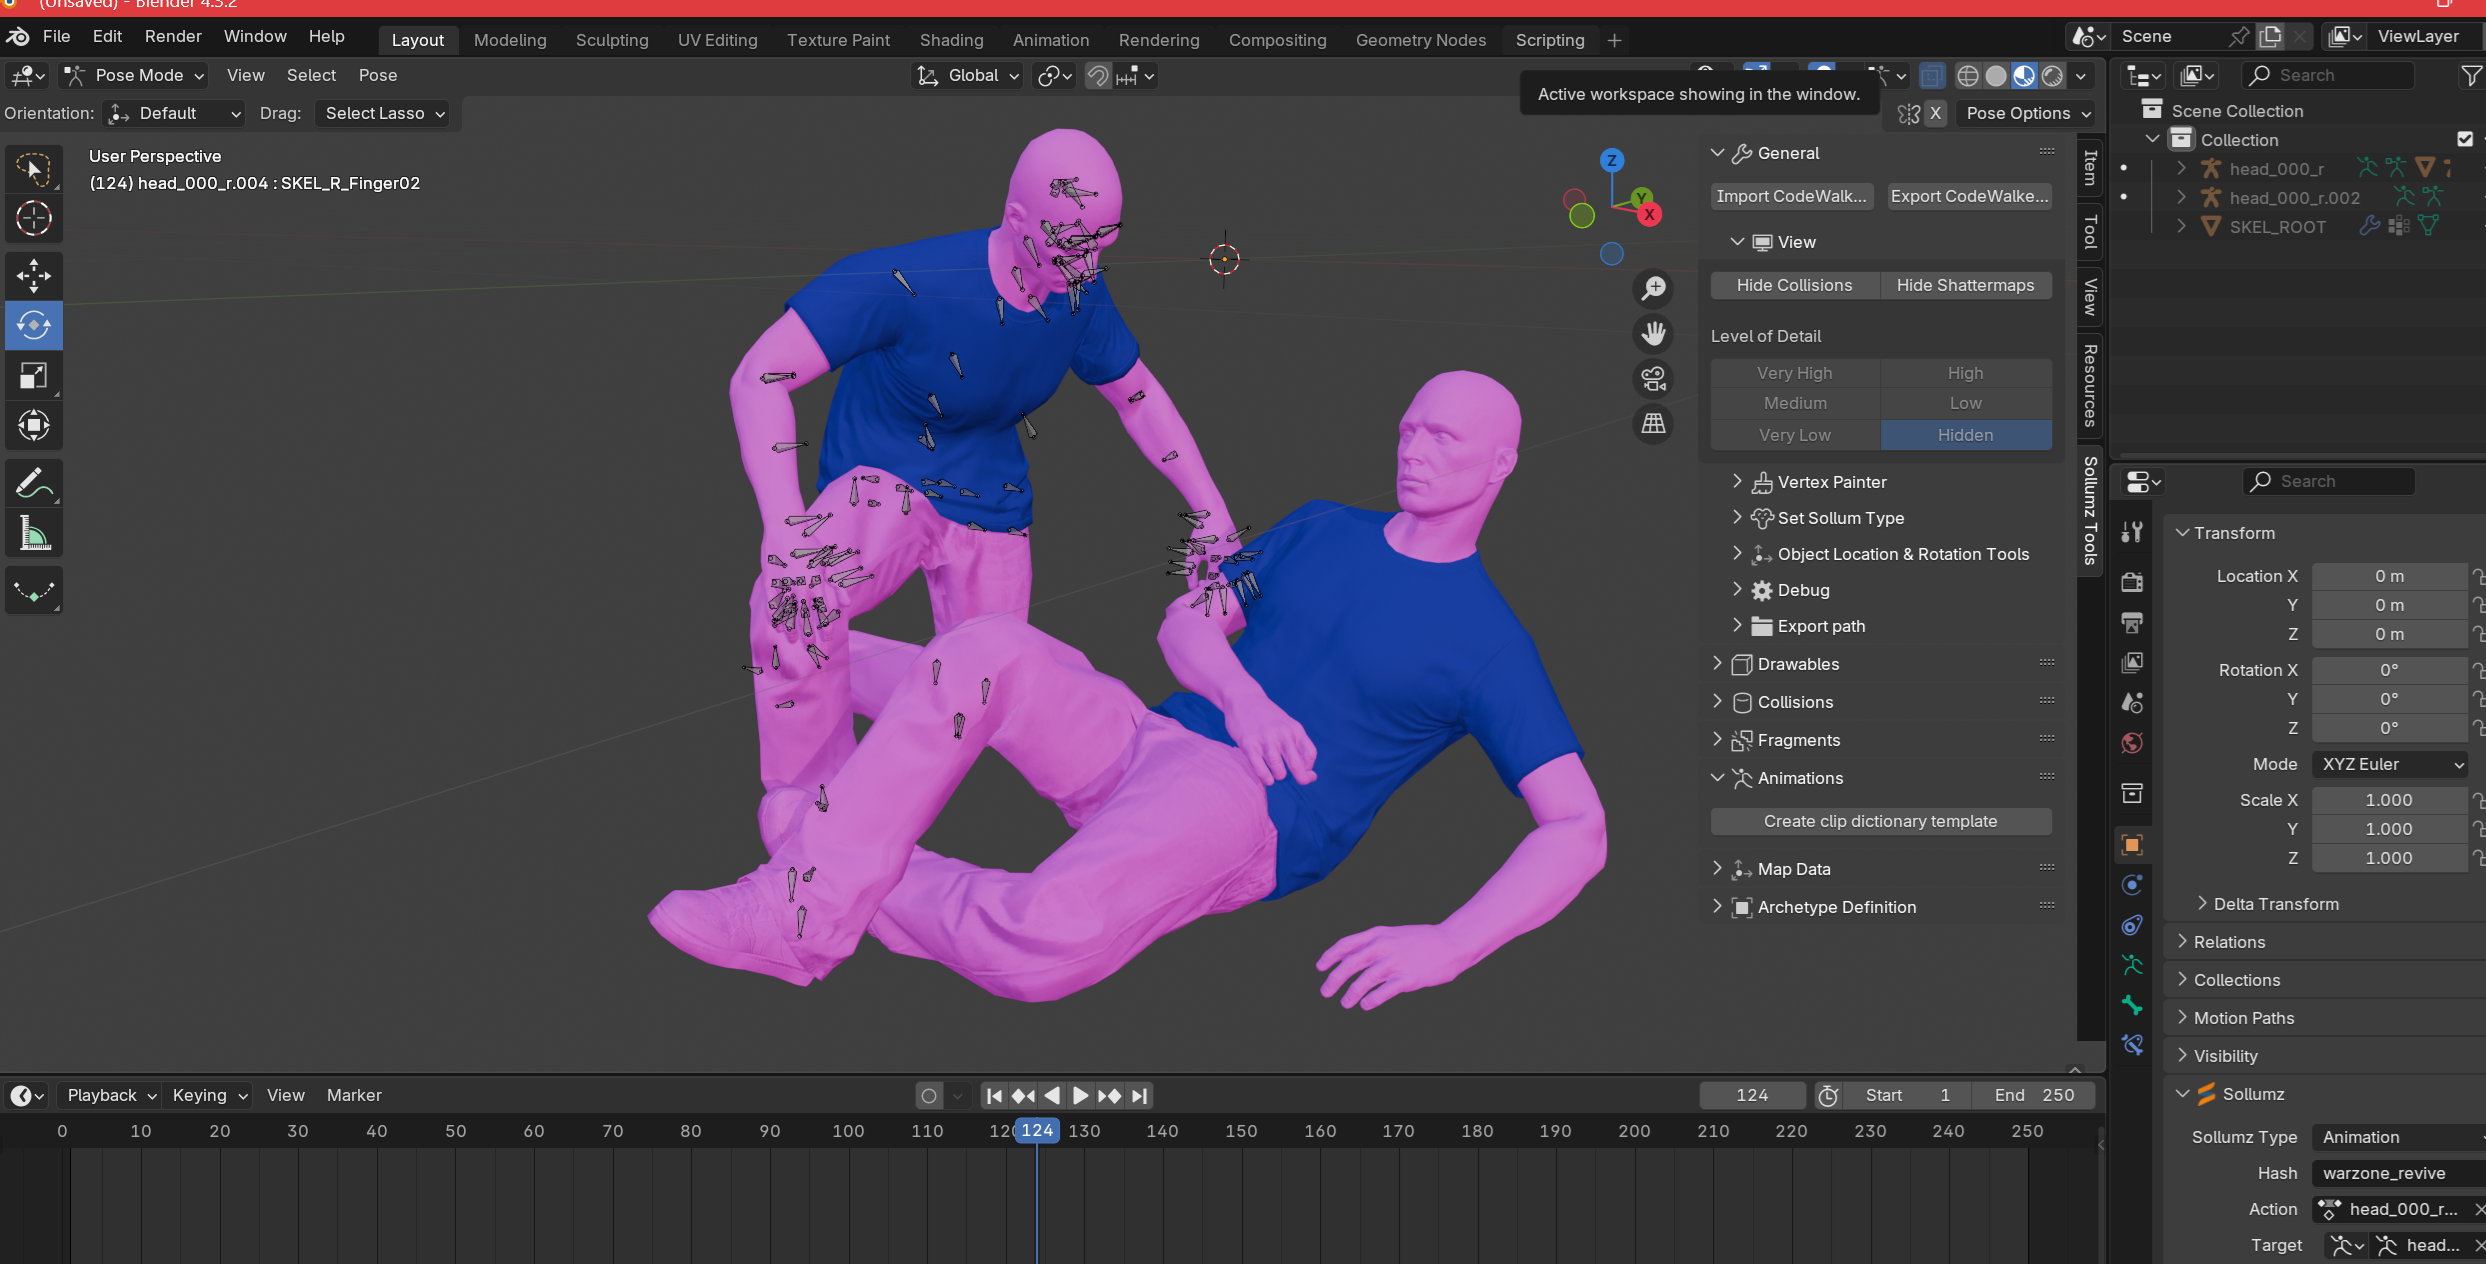
This is a pack of three custom-made animations that replicate the three possible revive stages from Call of Duty: Warzone: being downed, using a self-revive, and reviving someone else. I animated the "downed" and "reviving a teammate" states in tandem, so coupling those two will look proper.
I reviewed footage and screenshots to emulate the movements as closely as I could; however, I am by no means a professional animator, so they are not an exact 1:1 replica.
All of the clipsets orient your character so s/he is is not floating.
BUGS:
- These animations are not meant for first-person use
- Ped collision mappings may slightly overlap, resulting in props or other peds placed near the ped playing the animation to maintain a distance; very minor
This can be solved by freezing the animated ped in place and disabling its collision, then moving things nearby/around it like normal.
- The animations will face the opposite way of the direction you were initially facing in; very minor
- These animations are rigged for the mp_m_freemode_01 skeleton; using these on other peds may result in artifacting or stretched geometry; nonexistent, very minor, or noticeable depending on the ped
HOW TO INSTALL:
If you've never installed animations before, relax — stay with me here, as it is a rather simple process:
1.) First, ensure you have Menyoo, as it is required. You can install that here:
https://www.gta5-mods.com/scripts/menyoo-pc-sp
2.) Then, simply install this mod here; do not forget to add the dlcpack line to the dlclist.xml:
https://www.gta5-mods.com/misc/custom-animations-add-on-customanims#description_tab
3.) Once you have that installed, download my pack using the green button on the left of this page.
Unzip the download and you will find three .ycd files and a "CopyToFavouriteAnims.xml" XML file.
4.) In OpenIV, go to this path:
mods \ update \ x64 \ dlcpacks \ customanims \ dlc.rpf \ x64 \ anim \ ingame
You will see clip_amb@rpf and clip_mp_.rpf.
Open "clip_mp_.rpf" and drag the .ycd files in there.
If, in the end for some reason, these animations do not appear for you in-game, put the .ycd's in clip_amb@rpf afterwards; the creator of customanims suggests this as a solution, though I programmed the anims to work for clip_mp_.rpf.
5.) Now, open up your game's directory and navigate to your "menyooStuff" folder.
You will see a file named "FavouriteAnims."
Single-click it, then right click and select "Edit in [Notepad/text software]."
6.) With that .xml open, open my "Copy to FavouriteAnims.xml" XML file and transfer the three lines of script from it to your FavouriteAnims window, making sure you keep the spacings and format consistent when you paste them.
If any line is against the left side of the window, hit the "Tab" key at the beginning of it to properly align it.
7.) In the top left, click "File," then "Save."
Do not just close out with X!
8.) You're now sorted.
Launch the game, open Menyoo, navigate to the "Animations" tab and go into your favourites. You should find the three animations waiting for you there.
CREDITS:
- Animations manually done by myself
- blender for being the software used
Subido por primera vez: 22 de febrero de 2025
Última actualización: 22 de febrero de 2025
Descarga más reciente: hace 21 horas
8 Comentarios
Just millimetres from a trip to the Gulag...
This is a pack of three custom-made animations that replicate the three possible revive stages from Call of Duty: Warzone: being downed, using a self-revive, and reviving someone else. I animated the "downed" and "reviving a teammate" states in tandem, so coupling those two will look proper.
I reviewed footage and screenshots to emulate the movements as closely as I could; however, I am by no means a professional animator, so they are not an exact 1:1 replica.
All of the clipsets orient your character so s/he is is not floating.
BUGS:
- These animations are not meant for first-person use
- Ped collision mappings may slightly overlap, resulting in props or other peds placed near the ped playing the animation to maintain a distance; very minor
This can be solved by freezing the animated ped in place and disabling its collision, then moving things nearby/around it like normal.
- The animations will face the opposite way of the direction you were initially facing in; very minor
- These animations are rigged for the mp_m_freemode_01 skeleton; using these on other peds may result in artifacting or stretched geometry; nonexistent, very minor, or noticeable depending on the ped
HOW TO INSTALL:
If you've never installed animations before, relax — stay with me here, as it is a rather simple process:
1.) First, ensure you have Menyoo, as it is required. You can install that here:
https://www.gta5-mods.com/scripts/menyoo-pc-sp
2.) Then, simply install this mod here; do not forget to add the dlcpack line to the dlclist.xml:
https://www.gta5-mods.com/misc/custom-animations-add-on-customanims#description_tab
3.) Once you have that installed, download my pack using the green button on the left of this page.
Unzip the download and you will find three .ycd files and a "CopyToFavouriteAnims.xml" XML file.
4.) In OpenIV, go to this path:
mods \ update \ x64 \ dlcpacks \ customanims \ dlc.rpf \ x64 \ anim \ ingame
You will see clip_amb@rpf and clip_mp_.rpf.
Open "clip_mp_.rpf" and drag the .ycd files in there.
If, in the end for some reason, these animations do not appear for you in-game, put the .ycd's in clip_amb@rpf afterwards; the creator of customanims suggests this as a solution, though I programmed the anims to work for clip_mp_.rpf.
5.) Now, open up your game's directory and navigate to your "menyooStuff" folder.
You will see a file named "FavouriteAnims."
Single-click it, then right click and select "Edit in [Notepad/text software]."
6.) With that .xml open, open my "Copy to FavouriteAnims.xml" XML file and transfer the three lines of script from it to your FavouriteAnims window, making sure you keep the spacings and format consistent when you paste them.
If any line is against the left side of the window, hit the "Tab" key at the beginning of it to properly align it.
7.) In the top left, click "File," then "Save."
Do not just close out with X!
8.) You're now sorted.
Launch the game, open Menyoo, navigate to the "Animations" tab and go into your favourites. You should find the three animations waiting for you there.
CREDITS:
- Animations manually done by myself
- blender for being the software used
Subido por primera vez: 22 de febrero de 2025
Última actualización: 22 de febrero de 2025
Descarga más reciente: hace 21 horas
 5mods on Discord
This file has been approved automatically. If you think this file should not be here for any reason please report it.
I appreciate all your mods.... You are wonderful bro
Good stuff bro!
Very nice.
Wow,that is cool
This must mean that the weapon inspect/reload animations can be ported to, right?
@logoso2020 I made these from scratch in Blender and matched the poses as closely as I could to the in-game poses. Because COD skeletons have almost six times the amount of bones a GTA one has, you can't directly port the animations; those inspect/reload animations would have to be manually replicated as well.
@YourWelshRaptor Thank you